A Pair of socks
Please excuse the horrible English, I have never talked to anyone about knitting in English and never read anything about it (and apart from that, I'm no expert in knitting anyway, irrespective of the language). These are the instructions my grandma gave me, and as you can see, I needed a lot of images and extra text to make sure I knew what I was doing. Please feel free to use the
contact form to send suggestions for improvement!
German version as PDF
Casting on
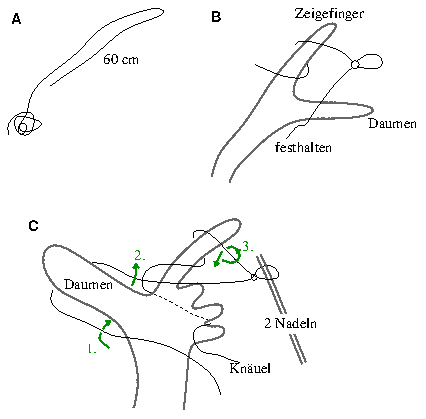
Figure 1: 60 cm is 23.6 inches. The thick grey line is supposed to be your left hand. 'Zeigefinger' = index finger, 'Daumen' = Thumb. 'festhalten' = hold on, 'Nadeln' = needles, 'Knäuel' = ball of wool.

Figure 2

Figure 3
- You need 72 stitches. To cast them on, make a loop of 60 cm length (doubled thread, so total length 120 cm) (see Figure 1A).
- Make a crotchet stitch (using your fingers), then put two needles through (Figure 1B)
- Use 2 needles to make the loop a little larger and the whole thing less tight. (Figure 2)
- Figure 1C: First, poke through the hole with both needles. Second, above, and third, around the back and then in front through the loop at the thumb. Forth and last, pull tight.
- Finally, distribute the 70 stitches over 3 needles: 2 times 18 and one time 36 (see Figure 3)
The bootleg
- Knit 2, purl 2, always in circles.
- On occasion, distribute the 36 stitches from the one needle to 2 needles, as well → you have 4 times 18 stitches now.
- For an average person, the bootleg needs to be 14 cm in length.
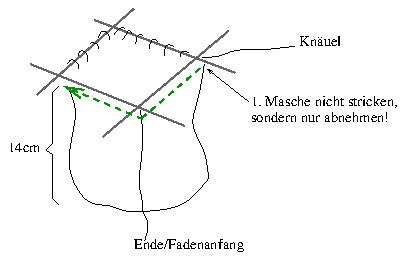
Figure 4: 14cm is 5.5 inches. 'Ende/Fadenanfang' = end/beginning of thread (where you started knitting). Small arrow says: "Don't knit first stitch, only take it off."
The heel
(If you have 73 stitches for some reason, take one off from the two purled stitches in the middle of the back of the sock).
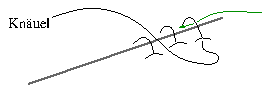
Figure 5. 'Knäuel' indicates where the ball of wool is.
- If you have the situation as shown in Figure 4, continue knitting only aling the green line (no purling).
- And put all stitches onto a single needle (36 stitches).
- But just take off the first stitch, do not knit it!
- This way, you'll get something I'll call "side-loop".
- Then turn the thing around and purl backwards, along the green line.
- Again, do not purl, but only take off the first stitch; see Figure 5: the thread needs to be in front when taking off while purling, and in the back when taking off while knitting.

Figure 6
- Knit one row, and purl back, until you have 14 side-loops at each side.
- The last row needs to be knitted.
- Stop rather than turning round the thing to start purling again.
- Then it should look like Figure 6:
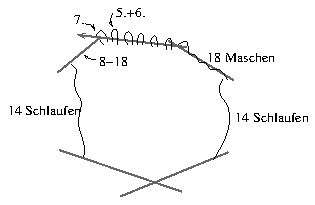
Figure 7: 'Maschen' are stitches, 'Schlaufen' are side-loops.
- Now take off the first stitch and purl half of the stitches (should be 18).
- Then take a new needle and continue purling.
- Purl together the 5th and 6th stitch (Figure 7)
- Purl one more stitch
- Turn everything around, take off the first stitch and knit back.
- Repeat the procedure on the other side/with the other needle: Knit forward, join stitch 5+6, then purl backward, taking off the first stitch.
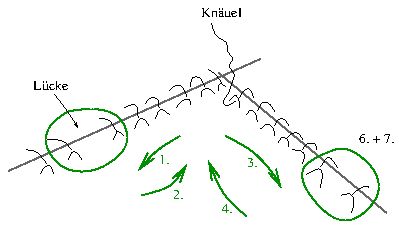
Figure 8 indicates the gap ('Lücke') between the two stitches that you need to join.
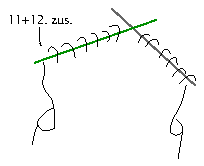
Figure 9
- For the next rows, joing stitch 6+7
- (Always join the 2 stitches between which the distance is bigger, see Figure 8)
- Don't forget to take off the first stitch rather than knitting or purling it.
- Knit the last row, joining the last two stitches (should be 11+12).
- Stop when you're at the edge = at the side of the sock (Figure 9).
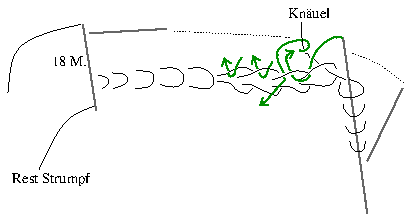
Figure 10. '18 M.' is short for '18 Maschen' = 18 stitches. 'Rest Strumpf' = remaining sock
- Then cast on the side-loops.
- Knit them as if they were sitting on a needle. Poke into the backward loop (Figure 10)
- Knit around half-way,
- then cast on the other 14 side-loops.
- Then knit around the other half.
- Now you should be back where you started casting on the side-loops
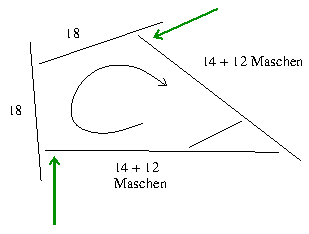
Figure 11
- After all side-loops have been cast on, start at the back of the sock (that's where the initial yarn is at the top of the bootleg)
- Knit one round
- Knit another round, joining the last resp. first 2 stitches from the needles with the many stitches (see arrows in Figure 11).
- Continue one round without joining, one roung with joining, until there are again 18 stitches on every needle.
Foot
- Knit around in circles until you reach the length up to the small toe of the foot (which is 21 cm for James' feet).
- Then join the stitches 2+3 (resp. 16+17 when coming from the other side) on the sides of the sock → there shold be only 17 stitches left on every needle now.
- Then knit 8 rows without joining
- Then knit one row, joining stitches 2+3
- Then knit 4 rows without joining
- Then knit one row, joining stitches 2+3
- Then alternate: one row without joining, one row with joining stitches 2+3 until you have only 10 stitches left on every needle.
- Then join stitch 2+3 in every round until all stitches are gone/together.
Finished!!!